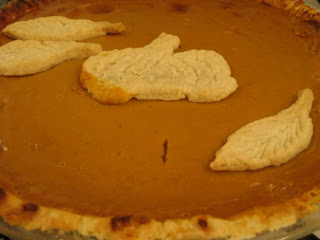
 Two pies today - Pumpkin and Apple. Pumpkin is pretty standard, an amazing recipe from the back of a can of Eagle Brand Sweetened Condensed Milk. Smooth and delicious, my Granny introduced me to this way of Pumpkin Pie making. And a not-so-standard apple pie, actually my first time making it. I'm using my classic crust recipe and my classic filling recipe, but the pie is instead many little "pielettes." Why, you ask? Because I have to travel with the pie, and I find that apple pies as big and full of fruit as the ones I make don't travel well. The juice sloshes about.
Ok, on to the baking.
I've made many a crust in my day, some with shortening, some without. One is not simpler than the other. One is not prettier than the other. But when it comes down to it, vegetable shortening kinda freaks me out. I mean, have you seen the stuff, let alone touched it? I know it's technically natural, but it sure doesn't seem so. So I'll stick to butter for my crusts today. "Oh no!" you may exclaim, "Your crust will lack in flakiness!" Not to worry, my fine feathered friend, I shall use extremely cold butter, I shall not over-mix my batter, and I shall remove my crust from the fridge at the last possible moment, thus ensuring the crust contains small chunks of butter in it upon entering the oven. As it bakes, the butter will melt, create pockets of air, and voila! A flaky crust!
Ok, really, on to the baking now. From the above rant, you may have caught the two most important aspects of pie crusting. Here they are, plain and simple:
1. USE COLD BUTTER! Freeze it if you feel so inclined. And don't let it set on the counter during various stages of prep. Pop it back in the fridge or freezer until needed.
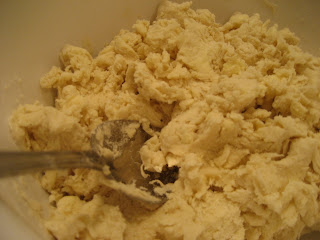
2. DON'T OVER MIX! I know, you're conditioned to mix and blend until creamy and smooth, but this is not what you want for pie crusts. You want lumps and chunks. You'll see what I mean in the pictures.
Ok, I mean it this time, really, on to the baking. This recipe is for a double crust (top and bottom of the pie); simply halve all ingredients for a single crust. Here's what you'll need:
All-Butter Crust
1 Cup (2 Sticks) Unsalted Butter, chilled
2 1/2 Cups Flour
1 Tbs Sugar
1 tsp Salt
1 Cup Ice Water (fill a measuring cup with water, add ice cubes)
Dice chilled butter into 1/2 inch cubes. Place in fridge. Combine flour, sugar and salt and mix thoroughly. Pour butter cubes on top of flour mixture and mix until butter forms pea-sized clumps. You can use a food processor, electric mixer or pastry mixer for this process, just be sure to NOT OVER MIX! This is mostly directed to those using a food processor. Don't get crazy with that pulse button, people. I like to hand-mix using a large spoon, sturdy whisk, or pastry cutter.
Butter and Flour - stop mixing at this consistency.
Pour 1/2 Cup ice water on top of the butter mixture. Stir using a spatula until large clumps form. If you find you need more water, add one tablespoon at a time.
Divide your dough into 2 equal portions. Wrap in plastic wrap and refrigerate until needed. After you've made your fillings (below), roll out your crust that has hopefully been chilling for at least 1 hour. Here are tips on rolling your crust: Use a lot of flour! Flour the counter, flour your hands, flour the rolling pin, flour the top of the pie crust, re-flour the counter...you get the idea. You can always brush off excess flour, but it is a much more difficult task to rescue sticky pick crust pieces stuck to the rolling pin. Roll to approximately a 1/8th-inch thickness, then cut a 12-inch diameter circle out of the dough. Flour the dough and the rolling pin yet again, roll your dough onto the pin, then roll it back out into your pie tin. Use excess dough for fun decorations on the top of your pie!
Time to make fillings!
Pumpkin Pie
1 15 oz can Pumpkin
1 14 oz can Sweetened Condensed Milk (I use Eagle Brand)
2 Eggs
1 tsp Ground Cinnamon
1/2 tsp Ground Ginger
1/2 tsp Ground Nutmeg
1/2 tsp Salt
Preheat oven to 425 Degrees Fahrenheit. Whisk pumpkin, sweetened condensed milk, eggs, spices and salt in medium bowl until smooth.
Roll out your pie crust as described above. Once in the pie dish, score the bottom of the crust with a fork a few times. Pour pumpkin filling into crust. Bake 15 minutes. Reduce oven temperature to 350 Degrees Fahrenheit and continue baking 35 to 40 minutes until a knife inserted 1 inch from the crust comes out clean. Cool before slicing.
Apple Pielettes
5-7 Peeled Apples (I like Granny Smith for baking)
1 Tbs Lemon Juice
1 Cup Sugar
2 Tbs Flour
1/2 tsp Cinnamon
1/4 tsp salt
1 Tbs Vinegar
Peel and dice apples (For a normal sized pie, slice them. For these pilettes, I dice.) Place diced apples in a large bowl of water with 1 Tablespoon lemon juice to keep them from turning brown. Mix sugar, flour, cinnamon, salt and vinegar in a large bowl. Like a really large bowl. You'll be adding the apples in a second, so make sure you have room. Ok, now add those apples. Mix until all apples are coated in the deliciousness of sugar and cinnamon. Heat oven to 400 Degrees Fahrenheit.** Time for the crust. Since these are tiny pies, the crust is a bit more intense of a process. Roll out as above to 1/8th-inch thickness. Cut into 4-inch diameter circles and lay into muffin tins.
Score the bottoms of the crusts. Add a healthy amount of apple filling to each pielette. Divide remaining liquid from filling bowl between all pielettes. Roll out any extra dough and slice into thin strips. Lay over tops of pielettes in a lattice pattern. Brush tops of pielettes with egg (to get that nice shine when done). Bake at 400F for 30-35 minutes**, or until crusts are golden brown. Carefully pop out of muffin tin and set on cooling rack.
**Dilemma. This is my first pielette experience. I did a google search to see at which temp/time I should bake them, and decided upon 345F for 35 minutes. A normal sized apple pie would bake at 400F for 50 minutes. I ended up leaving my pielettes in at 345F for an entire hour. This could have been due to the amount of moisture in my filling, the crusts being a tad thick, or it could just be proof that the oven needs to be at the standard heat of 400F. Not to say they didn't turn out delicious, um, they did, but next time I make these, I will definitely bake at 400 Degrees Fahrenheit for 30-35 minutes. To avoid the hassle of checking them for doneness every 5 minutes.
Thoughts
So after my first experiment with pielettes, here is what I found:
*Make extra crust. I wanted more for the lattice tops.
*Cut initial crust circles a bit larger than 4 inches in diameter. This will allow you to fold the crust over the filling a bit and make removing the pielette from the muffin tin easier.
*Bake at 400F for 30-35 minutes, instead of decreasing the temperature. See above.


No comments:
Post a Comment